Activity settings in the Details pane
The Activity Detail pane allows you to set the start date and duration of the activity, indicate who will organise it and where; determine how long you will need to prepare or follow-up the activity; and how many times you need to repeat the activity.
There are five tabs available:
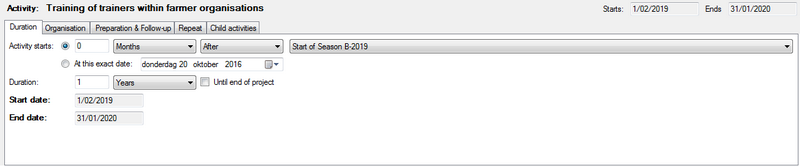
- Duration tab: when will the activity start and how long will it take?
- Organisation tab: who will organise it and where? What type of activity is it?
- Preparation and follow-up tab: if necessary, you can specify how much time you will need to prepare and to follow up the activity
- Repeat tab: you can repeat an activity and specify how many times you want to repeat it and if you need to prepare and follow-up each time.
- Child activities: if the activity is a process and has sub-activities, they are listed here. In that case, the Duration and Repeat tab will not be visible.
Duration tab
Duration tab settings:
- Select a relative date or an exact (absolute) date using the radio buttons
- To set a relative date:
- Select the top radio button
- Enter the number of days, weeks, months, trimesters, semesters or years
- Select ‘days’, ‘weeks’, ‘months’, ‘trimesters’, ‘semesters’ or ‘years’ from the left drop-down list
- Select ‘After’ or ‘Before’ the key moment in question using the centre drop-down list
- Select a key moment or activity from the right drop-down list
- To set an absolute date:
- Select the bottom radio button
- Enter the date or use the date selector (press on the little downward facing arrow) to choose the date
- Duration:
- Enter the number of days, weeks, months or years
- Select ‘days’, ‘weeks’, ‘months’, ‘trimesters’, ‘semesters’ or ‘years’ from the left drop-down list
- You can check the ‘Until end of project’ box on the right. Logframer will then calculate how many days/weeks/months/years remain until the end of the project and set the number. Note that only whole numbers can be used, so if you've selected weeks, months, trimesters, semesters or years the activity may not take until the very last day of the project. If you want to make sure the activity lasts until the very last day, make sure to select ‘days’ from the drop-down list.
The actual start date will and end date of the activity will appear in the top-right corner of the pane, as well as on the bottom of the Duration tab.
Organisation tab
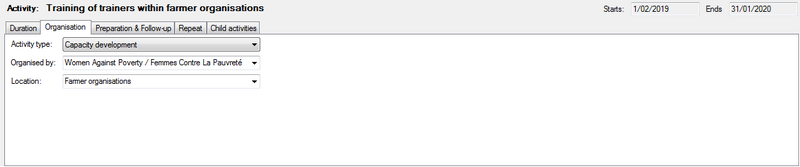
Organisation tab settings:
- Choose an activity type from the drop-down list. The colour of the activity in the Gantt chart will change according to this setting.
- Organised by: select one of your partners from the drop-down list, or type the name of another organisation or person.
- Location: select a location from the drop-down list or type a new one.
Preparation and follow-up tab
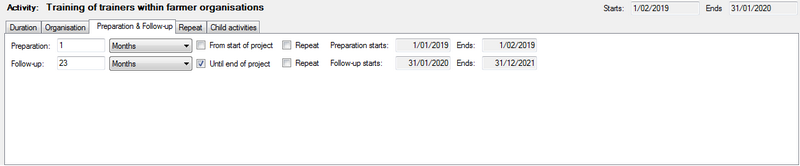
Preparation and follow-up tab settings:
Preparation and follow-up periods can be identified for every activity, but they are totally optional.
- Preparation:
- Enter the number of days, weeks, months, trimesters, semesters or years
- Select ‘days’, ‘weeks’, ‘months’, ‘trimesters’, ‘semesters’ or ‘years’ from the drop-down list
- Check the ‘From start of project’ box to make sure that the preparation period starts as soon as your project start. Note that only whole numbers can be used, so if you've selected weeks, months, trimesters, semesters or years, the preparation may not start on the very first day of the project. If you want to make sure the preparation starts the very first day, make sure to select ‘days’ from the drop-down list.
- If the activity will be repeated, check the Repeat box if you want to repeat the preparation as well. If you only need to prepare for the first time alone, leave this box unchecked.
- Follow-up:
- Enter the number of days, weeks, months, trimesters, semesters or years
- Select ‘days’, ‘weeks’, ‘months’, ‘trimesters’, ‘semesters’ or ‘years’ from the drop-down list
- Check the ‘Until end of project’ box to make sure that the follow-up period ends when the project ends. Note that only whole numbers can be used, so if you've selected weeks, months, trimesters, semesters or years, the follow-up may not end on the very last day of the project. If you want to make sure the follow-up does end on the very last day, make sure to select ‘days’ from the drop-down list.
- If the activity will be repeated, check the Repeat box if you want to repeat the follow-up period as well. If you only need to follow-up after the first time, leave this box unchecked.
Repeat tab
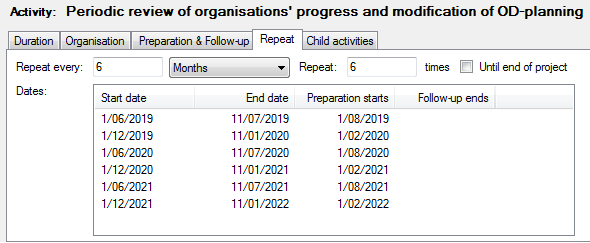
Repeat tab settings:
If you have a repeating activity, you can make use of these settings. Repeating an activity is optional, so in most cases you won't have to fill out this information.
- Repeat every: enter a number of days, weeks, months, trimesters, semesters or years
- Select ‘days’, ‘weeks’, ‘months’, ‘trimesters’, ‘semesters’ or ‘years’ from the drop-down list
- Enter the number of times you want to repeat the activity
- If you want the activity to be repeated until the end of the project, check the ‘Until end of project’ box
Once you've set the repeat settings, the Dates list will give you an overview of how many times and when exactly the activity will take place.
Child activities tab
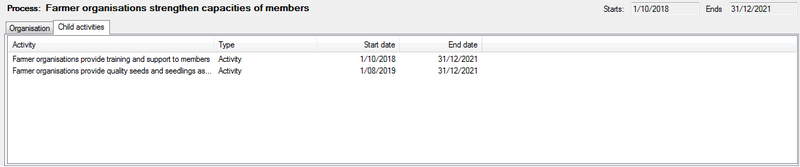
You can use this tab to add, edit or remove child activities, using the Items toolbar (click into the list view first).
Once you've added a child activity, the activity becomes a process. This means that its duration will be determined by the duration of the child activities. As a consequence, the Duration, Preparation & Follow-up and Repeat tabs will not be visible any more.
You can also add, edit or remove child activities using the main planning window.