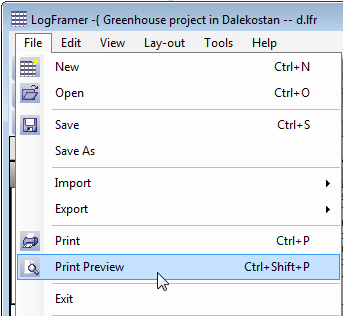
Printing in version 1.0 and 1.1
The print and print preview interface has been changed since Logframer 1.2. On the following pages, you can find information about how to print in the first two versions of Logframer (1.0 and 1.1)

Using the Print and Print preview buttons in the General toolbar, you can print or preview:
- Your logical framework;
- The list of indicators
- The Performance Measurement Framework (PMF)
- The Risk Register (RR)
- Your project’s planning
- The list of partners
- The target group identification form
To print one of these reports, simply click into the related area. For instance, if you want to print your logical framework, you click on one of the cells, and then on the Print or Print preview button.
For the other reports, you must make sure that the Details section is visible by clicking on the  button in the Lay-out toolbar. Then click in the Detail window in the bottom of your screen and finally on the Print or Print preview button.
Alternatively, you can use the Main menu, by clicking on File → Print… or File → Print preview…
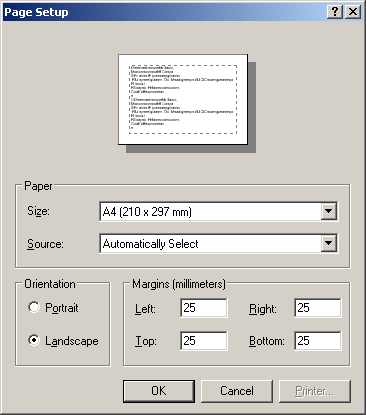
Page set-up
You can select the paper size, change the orientation of the paper and adapt the printing margins with the Page set-up dialog.
To open this dialog, select File → Lay-out → Page lay-out…
Printing your logframe
To print your logical framework, simply click on one of its cells, and then on the Print or Print preview button.
Logframer automatically rearranges the width of your columns, so that your logframe will fit the width of your paper. You do not have to worry whether everything will fit on your paper, or make manual adjustments. Secondly, Logframer will also hide the empty cells, to make maximum use of the available space.
Instead of printing your whole logframe, you can choose to print only the first column, or only the objectives and the assumptions, or the objectives, indicators and verification sources, and so on. To do so:
- In the design window, hide the columns you want to hide using the Column lay-out buttons
 .
. - Then press the Print or Print preview button
Printing the list of partners
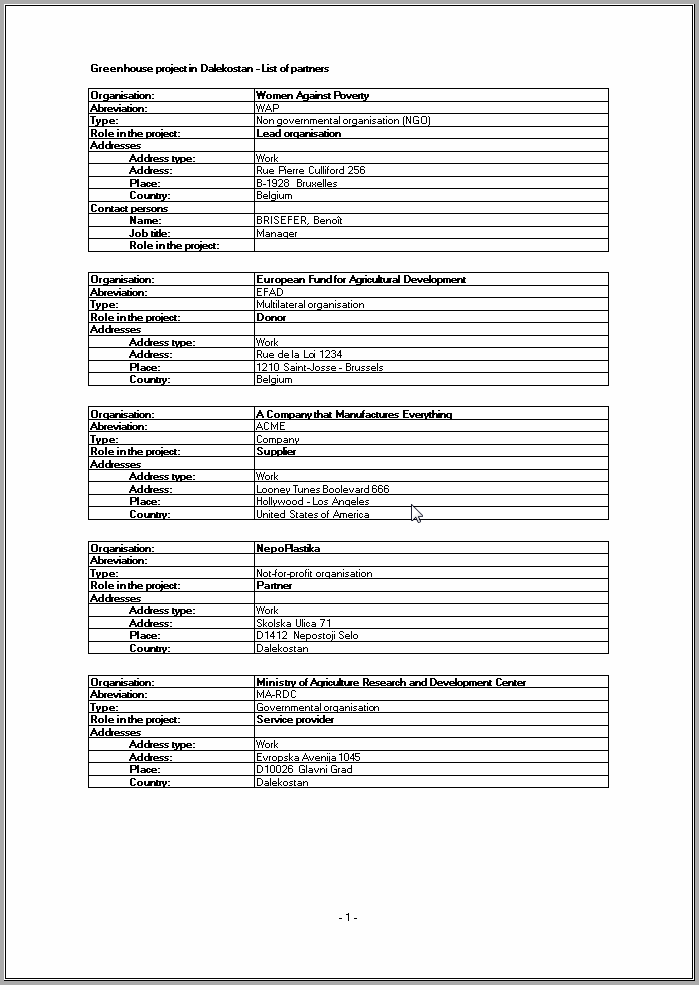
The list of partners is a table with basic information about each partner, including its name, its role in the project and contact information (addresses and contact persons).
To print directly, click on File → Print... → Print list of partners in the Menu bar, or File → Print preview... → Print preview of list of partners to get a preview first. Logframer will show you the following dialog box:
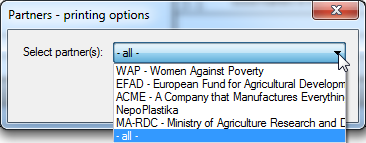
You can choose to print information about all your partners, or just info about a single partner. When you've made your choice, click < Ok > to continue.
Printing the target group identification form
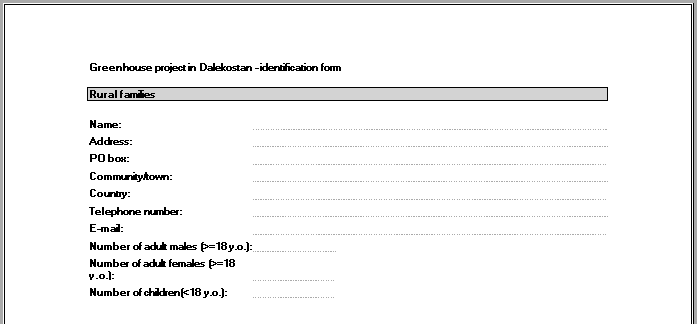
The target group identification form is a form that can be used in the field to identify beneficiaries. This form allows you to identify the beneficiary by his/her name, address and other contact information. You can also add any other relevant information using custom fields. To add custom fields, see the chapter about Identification of your target group.
To print directly, click on File → Print... → Print target group ID form in the Menu bar, or File → Print preview... → Print preview of target group ID form to get a preview first. Logframer will show you the following dialog box:
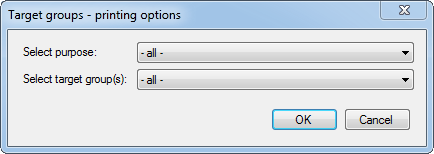
You can select the purpose (if you have more than one purpose) and the target groups of that purpose (if you have more than one target group). Alternatively, you can print identification forms for all target groups of all purposes.
Printing the list of indicators
The list of indicators prints your indicators in the form of a list or a questionnaire. To print this list, click on File → Print... → Print indicators or File → Print preview... → Print preview of indicators. You will then get the following window, where you can select a number of options:
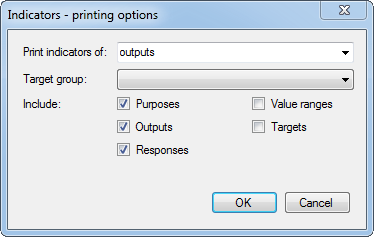
First of all, you can select which indicators you want to include in your list or questionnaire:
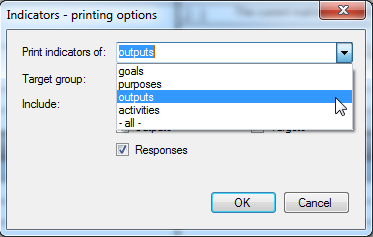
Generally you'll want to use the output indicators to monitor the results of your project. Then, if you've got more than one target group in your project, you can select from which target group you want to print the indicators. This means that you can create a questionnaire specifically for one target group, instead of having all the different indicators mixed up in your form.
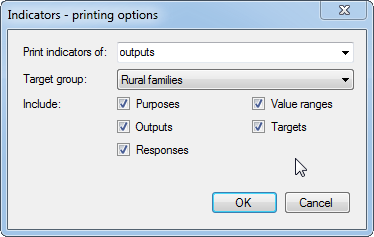
Underneath you can see a series of check boxes. These allow you to specify what information you want to include. The first two options allow you to choose whether you want to show the purpose(s) and outputs to which the indicators belong. This is handy if you want to have a clear overview, but if you want to use the list as a questionnaire, you may want to uncheck these options. Otherwise the respondents will know why you ask a certain question and that may influence their answer.
If you want to have a detailed overview of your indicators, including for each indicator the possible answers (responses), value ranges and targets, you should check the last three options. But again, if you want to create a questionnaire that you'll hand out to the respondents, then you may want to uncheck these options. Otherwise they'll see what the 'right' answers are. For an interviewer, it is important to know what the value ranges are, but again you may want to hide the targets so that he or she can't accidentally give away the right answer.
Once you've selected the options that you want, you can press the < Ok > button.
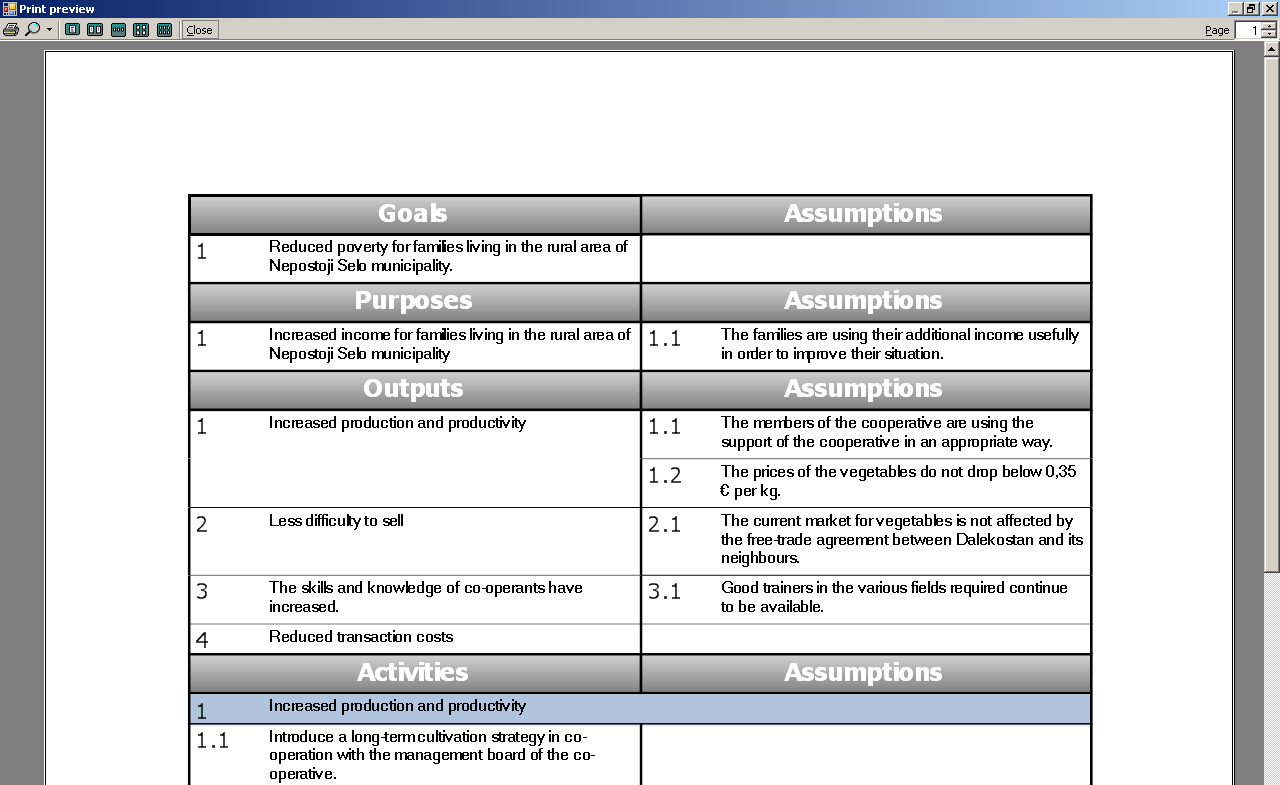
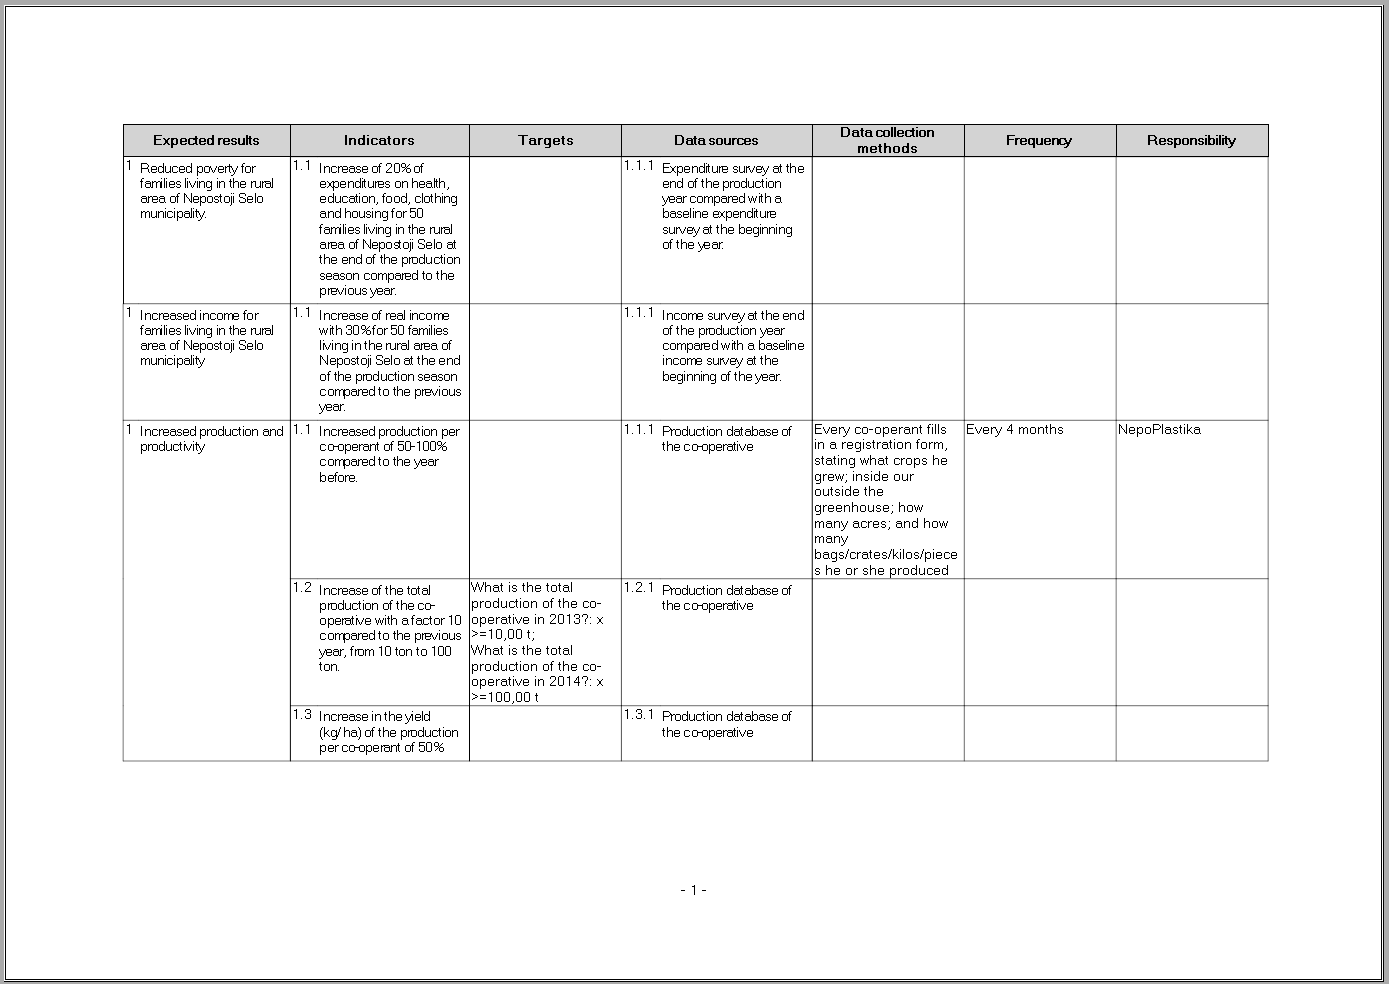
Printing the Performance Measurement Framework (PMF)
The Performance Measurement Framework is a table that presents an overview about:
- The expected goals, purposes or outputs
- How you will follow-up progress (indicators)
- Baseline information and targets at the end of the project
- What data sources (verification sources) you will use
- How you will collect data
- At what frequency
- Who's responsible for the data collection.
In the Menu bar, click on File → Print... → Print Performance Measurement Framework (PMF) or File → Print preview... → Print preview of Performance Measurement Framework (PMF). Logframer will show you the following window:
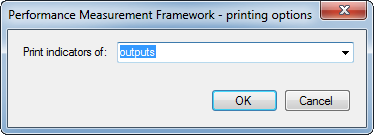
Here you have the option of creating a PMF with:
- The goals and their indicators, verifications sources, etc.
- The purpose(s) and its (their) indicators etc.
- The outputs and their indicators etc.
- All objectives and their indicators, verifications sources, baselines, data collection methods etc.
Click < Ok > to continue.
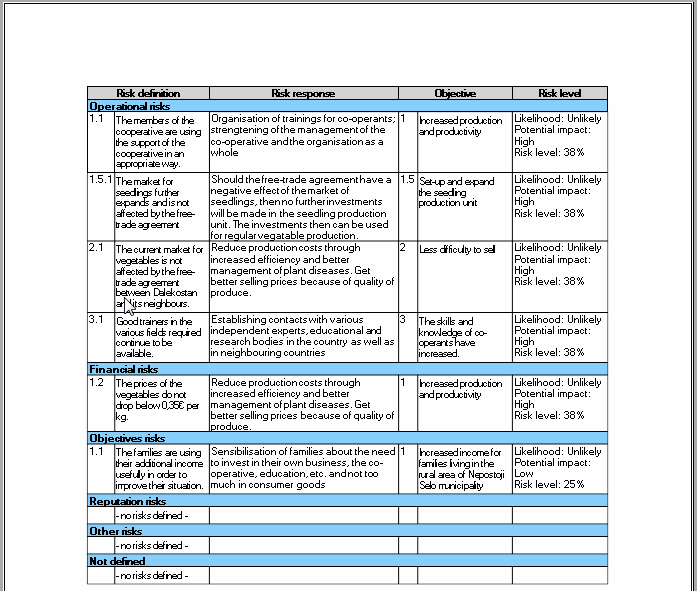
Printing the Risk Register (RR)
To print the risk register, click on File → Print... → Print Risk Register. To see the print preview of the risk register, go to File → Print preview... → Print preview of Risk Register.
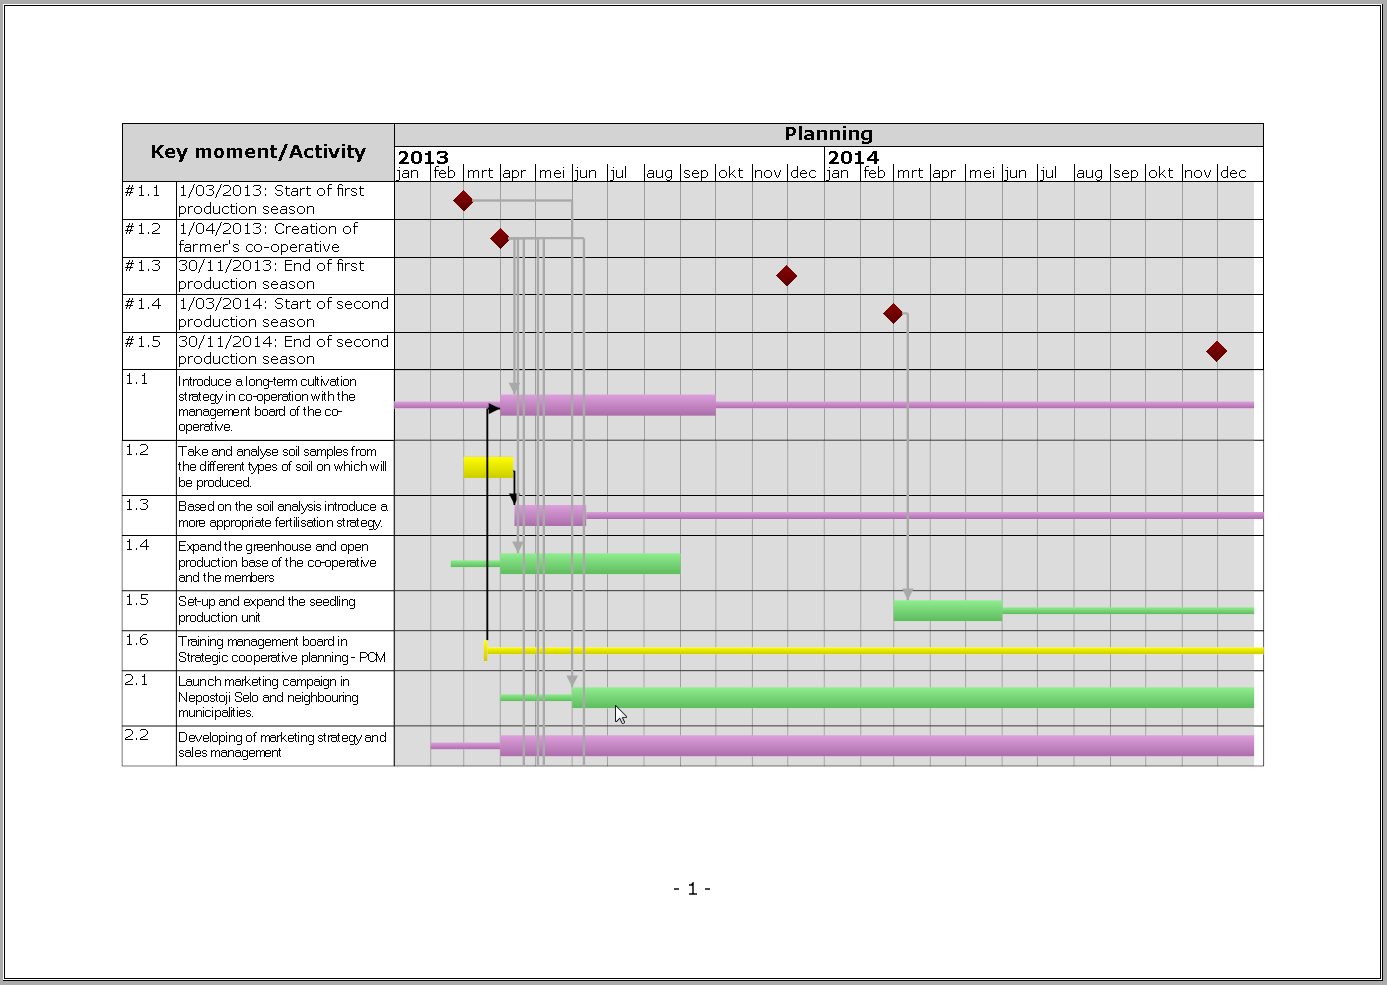
Printing your project’s planning
To print the planning, click on File → Print... → Print Planning. To see the print preview, go to File → Print preview... → Print preview of Planning.
Alternatively, you can open the Planning window by clicking on the  button in the Lay-out toolbar. Then in the planning window you can click on the
  buttons to print or see the print preview respectively.
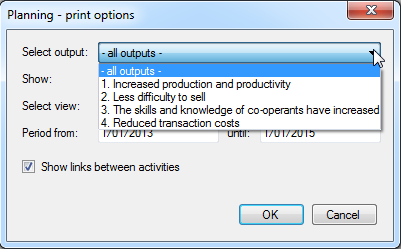
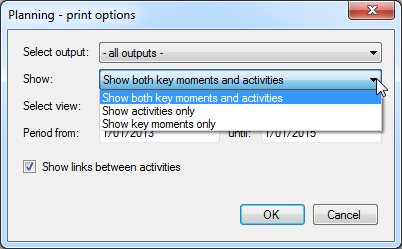
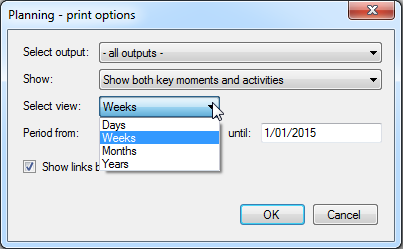
In both cases you will get the following dialog:
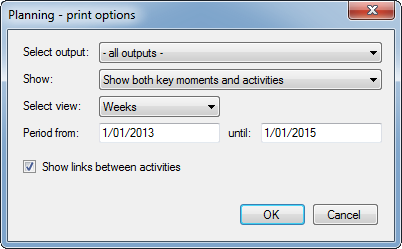
Here you can select a number of options:
- For which output you want to see the activities; if you select - all outputs - you will see the planning of your whole project.
- Whether you want to see both key moments and activities, activities only or key moments only
- The level of detail: planning per day, per week, per month or per year
- For which period you want to see the planning. By default you get the entire length of your project, but you can select any period you want within the course of your project.
- Finally, you can choose whether you want to show the links (arrows) between the activities and key moments. If you uncheck the box the links won't show.
 |
 |
 |
When you press the < OK > button you will get the preview, or the printing will begin.